Learn how to create a precise diamond shape using Illustrator's vector tools and techniques in this tutorial on making a perfect diamond in Illustrator.
Creating a diamond is quite simple in illustrator. So, in this tutorial we are going to do the same, create one. Below is a proportional diamond line which we can use as a guide.

1. Make a template
First you have to place the line art. Go to File>Place and select the graphic. Navigate to Layers Palette > Template. This will lock and make the graphic transparent for easy tracing.

2. Placing the guide
Turn on the Rulers using Ctrl/Command+R. Drag a guide and place it in the centre.
Press Shift+Ctrl+”/Shift+Command+” or go to Window>Snap to Grid to turn on the Snap to Grid. The grid will appear in the background.
3 Trace the artwork
In the Layer Palette, make a new layer. Using the Pen Tool, start to trace each facet. The points will snap to the grid. Make sure to close each shape and make the points meet at the same spot. Continue this until we complete the right half of the diamond. To manually adjust the points to fix the curves you can off the Snap to Grid.

4. Reflecting the diamond
Choose half of the diamond. Go to Reflect Tool and Alt/Option+click on the centre guide line. A menu will pop up. Choose Vertical for Axis and click Copy.

Choose both the facets at the bottom and hold Alt/Option+Click and click Add to shape area from Pathfinder (Window>Pathfinder) to combine the facets. Repeat this step for the top facets too.


5. Fill the diamond
Choose one of the facets and fill it with Linear Gradient. Make a 3rd point in the gradient by clicking in between the 2 points once and make it black. Also turn off the stroke for the facet.
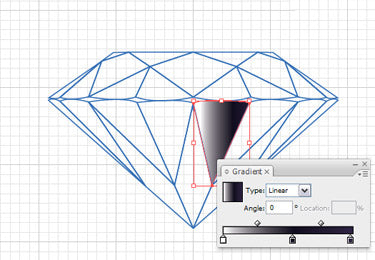
Choose the rest of the facets. Using the Eye Dropper Tool, click once on the facet having the linear gradient. This will fill the rest with gradient.
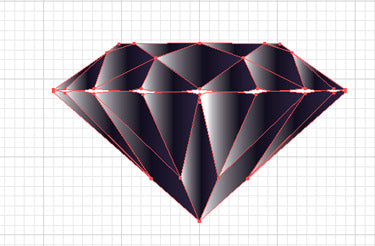
Choose the Gradient Tool and click and drag in different directions for each facet. You will get something as shown below.

Select all the facets and open the Gradient and Colour Palette. Click once at the middle black point in the Gradient Palette. The Colour Palette will show the black colour. Change it to a darker blue to make the diamond look better.

6. Drawing the girdle
We have not drawn the girdle. Using the Rectangle Tool, draw a rectangle that meets all four points of the girdle’s edges. Click once at the middle of the top line of the selected rectangle with the Pen Tool. This will add a new point. Click the Keyword Arrow Key and shift the point upwards. Do this for the bottom too. Now, Right+Click and select Arrange>Send to Back to cover the missing girdle.


7. Finishing Touch
The diamond won’t look perfect without the shining glow and sparkling starburst. So let us make that too. Draw a circle and fill it with Radial Gradient from white to black and send it to the back of the diamond.

Choose the Star Tool and drag a star on the canvas. Without releasing the mouse, press the Arrow Up key to add additional points. Hold Ctrl/Command and drag to increase the radius. Try to get a starburst as given below.

Final Image


