Welcome to the Illustrator guide for making a gradient ribbon! Ribbons may be a wonderful design component to incorporate into your projects, and you can give your design depth and dimension by using gradients. In this tutorial, we'll demonstrate the process of creating a straightforward ribbon with a gradient effect that you can modify to suit your design requirements. This tutorial will walk you through each step of making a lovely gradient ribbon in Illustrator, regardless of your level of experience. Let's begin!
Step #1: Make a Circle
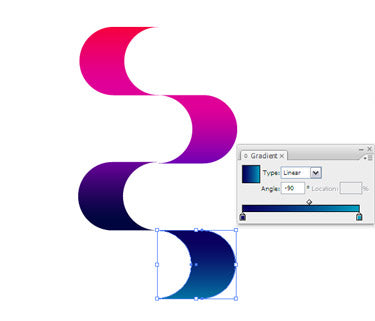
Using the Ellipse tool create a circle by holding the Shift key and apply a linear gradient at 90°. Cut the Circle in Half and Duplicate


With the Direct Selection tool (white arrow), choose the most right anchor point of the circle and press Delete. Click and drag 1/2 of the circle to the right holding both the Shift key and Option/Alt key. The Option/Alt key is to duplicate the object and the Shift key is to make sure that its shape stays horizontally perfect.
Step #2: Join the segments
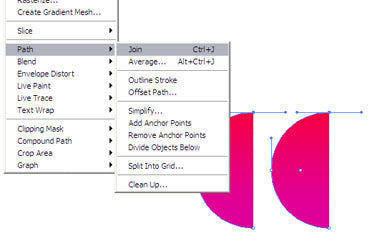

Drag a selection with the Direct Selection tool over the top most anchor points. Navigate to Object > Path > Join or hit Cmd/Ctrl + J. Perform the same step for the bottom anchor points too. Now you are very close to the shape.
Rotate duplicate at 180°

Step #3: Turn on the Smart Guides
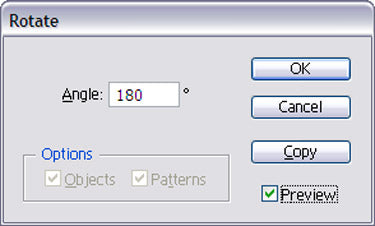
View > Smart Guides. Choose the Rotate tool and click precisely on the anchor point at the bottom right. Hold the Option/Alt key a window will appear. Enter a value of -180° and select Copy. Or you can also click without holding the Option/Alt key and drag the shape holding both the Option/Alt key and Shift key as shown in the image above.
Step #4: Apply Gradient
Apply a new gradient by adjusting the bottom colour.
Rotate duplicate at 180° both objects

With the Selection tool choose both the shapes. Click precisely on the bottom left anchor point. Do this again by holding the Option/Alt key and enter a value of -180° and hit Copy or drag ‘by hand’ holding both the Option/Alt key and Shift key.


Step #5: Adjust the gradient of both shapes.
The colour at the bottom of the shape that follows is the same at the top. This allows a smooth transition. Select both the duplicated shapes and click in the same spot again holding the Option/Alt key. Enter a value of 125% and click OK. Repeat this step if needed.
